In May I will be teaching an Interop workshop on Python Basics for Networking Professionals. In that course, you will (hopefully) gain an understanding of Python fundamentals that you can build upon to automate tasks in your environment.
While an understanding of programming fundamentals is ultimately essential for automation, it is also helpful to see practical automation examples. In that vein, this article will show you how to use Python to configure BGP on three network devices.
In order to make the example more interesting, this demonstration will use three different platforms -- Arista EOS, Cisco IOS-XR, and Cisco IOS.
Additionally, the program will perform both ‘show’ and ‘config’ operations. In other words, the program will use a combination of operational state information and configuration changes (as well as interactions between the two).
With all that covered...let’s get started.
My lab environment contains these three network devices:
- an Arista vEOS switch running EOS 4.15.4F on KVM,
- a Cisco IOS-XRv router running IOS-XR version 5.3.1 on KVM,
- and a Cisco IOS router running IOS version 15.4(2)T1.
The three devices all share a common LAN subnet (10.220.88.0/24).
In addition to the network devices, I also have an AWS EC2 Linux server running Python 2.7.10. This server has SSH access into the three network devices.
Create the Python environment
The first thing I need to do is set up my Python environment; basically, I want a clean Python environment. In order to accomplish this, I use Python’s virtualenv to create a new sandbox with a minimal set of libraries pre-installed.
The AWS instance that I am using contains multiple versions of Python; consequently, I explicitly specify the Python that I want to use when creating the virtual environment.
$ virtualenv -p /usr/bin/python2.7 bgp_test
Running virtualenv with interpreter /usr/bin/python2.7
New python executable in bgp_test/bin/python2.7
Also creating executable in bgp_test/bin/python
Installing setuptools, pip, wheel...done.
Now that the virtual environment has been created, I next need to ‘activate’ it. This will cause my Python context to switch to the new virtual environment.
$ source ~/VENV/bgp_test/bin/activate
At this point, I am ready to install any libraries that I require.
For this demonstration, I am going to use Netmiko. Netmiko is an open-source Python library based on Paramiko SSH that I have been working on since late 2014. It provides a fairly uniform programming interface across a broad set of network devices. It also handles many of the low-level SSH details that can be time consuming and problematic.
Since Netmiko is based on SSH, it is still a legacy screen-scraping interface. In other words, Netmiko uses an interface primarily intended for humans (SSH) and returns text strings that have to be processed (as contrasted to using an API that returns structured data).
Because I want to use Netmiko version 0.4.2 for this demonstration, I am going to clone the ‘master’ branch from GitHub and then install it.
$ cd ~
$ git clone https://github.com/ktbyers/netmiko
Cloning into 'netmiko'...
remote: Counting objects: 3173, done.
remote: Compressing objects: 100% (118/118), done.
remote: Total 3173 (delta 46), reused 0 (delta 0), pack-reused 3055
Receiving objects: 100% (3173/3173), 600.13 KiB | 619.00 KiB/s, done.
Resolving deltas: 100% (2037/2037), done.
Checking connectivity... done.
$ cd netmiko
$ python setup.py install
Note, you could also just execute ‘pip install netmiko’ but this will get you a slightly older version of Netmiko (Netmiko 0.3.4).
Now I can verify that Netmiko is properly installed:
Note, you could also just execute ‘pip install netmiko’ but this will get you a slightly older version of Netmiko (Netmiko 0.3.4).
Now I can verify that Netmiko is properly installed:
$ python
Python 2.7.10 (default, Dec 8 2015, 18:25:05)
[GCC 4.8.3 20140911 (Red Hat 4.8.3-9)] on linux2
Type "help", "copyright", "credits" or "license" for more information.
>>> import netmiko
>>> netmiko.__version__
'0.4.2'
The programming environment is now set up correctly. Consequently, I can start working on the basics of the program.
Build the program
The first thing I need to do is establish an SSH connection to each of the three devices. I also need to verify that this connection is working properly.
In order to establish an SSH connection, I need certain information (for example, IP address, SSH port, username, and password). Since I am going to be reusing this information and since some of the information is confidential, I am going to specify this information in a separate Python file named my_devices.py.
This file currently looks as follows:
cisco_ios = {
'device_type': 'cisco_ios_ssh',
'ip': '10.10.10.27',
'username': 'admin',
'password': 'passwd',
'port': 22,
}
cisco_xr = {
'device_type': 'cisco_xr_ssh',
'ip': '10.10.10.27',
'username': 'admin',
'password': 'passwd',
'port': 9722,
}
arista_veos = {
'device_type': 'arista_eos_ssh',
'ip': '10.10.10.27',
'username': 'admin',
'password': 'passwd',
'secret': '',
'port': 8622,
}
The above file contains three Python dictionaries with each dictionary corresponding to one of the network devices.
The mechanics of Python dictionaries are not too important here, but the above definitions provide Netmiko with everything it needs to create the SSH connection. (Note, I have made some minor modifications to the above data to keep my usernames, passwords, and IP addresses private.)
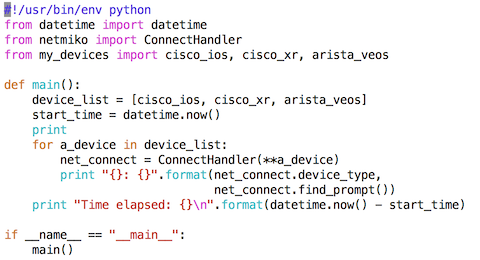
Now that we have defined all of the devices, how do we create a Python script that establishes the SSH connections? What follows is an initial version of the program (this script is also posted online here).
I am going to skip over some of the mechanics of how Python would process this file, but the main program execution starts by calling the main() function. The main function is the line specified by ‘def main():’.
Inside this function, a timestamp is created to indicate the start of the program (it is not quite the start of the program, but it is close enough for our purposes). This will let us keep track of how long the program takes to execute.
The program then enters a small for-loop. This for-loop will take each of the three network devices (defined in the my_devices.py file) and connect to them one after the other.
for a_device in device_list:
net_connect = ConnectHandler(**a_device)
ConnectHandler is a Netmiko function that picks the correct class to use based on the device type (basically one set of code will be executed if the device is ‘Cisco IOS,’ a different set of code will be executed for ‘Cisco IOS XR’, etc.). This ConnectHandler call will cause the SSH connection to be created including logging into the device.
After the connection is completed, I execute a print statement that prints out the type of device and the current router prompt.
Here is what I see when I execute the program:
$ ./load_bgp_config_part1.py
cisco_ios_ssh: pynet-rtr1#
cisco_xr_ssh: RP/0/0/CPU0:pynet-xrv#
arista_eos_ssh: arista-sw5>
Time elapsed: 0:00:06.272486
Check for BGP
Now, remember our goal is to configure BGP on each of these three devices. Our program at this point is creating an SSH connection and printing the device’s prompt.
In the next step, we will use Netmiko’s enable() method to cause the Arista switch to enter enable mode. Additionally, we will check if BGP is already configured or not.
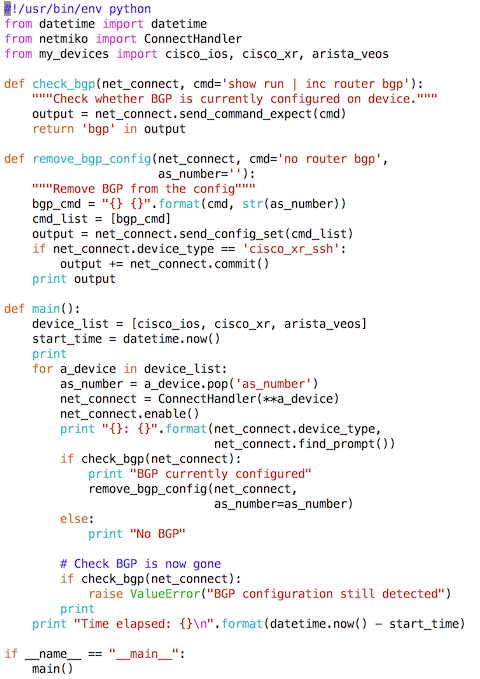
What follows is the second version of my program (you can also view the code here).
The above code is similar to what I had previously. In it, I have added a ‘check_bgp’ function. This function uses the send_command_expect() method to execute the ‘show run | inc router bgp’ command and returns the corresponding output. Based upon the text returned from this command, the function returns either True or False (corresponding to whether BGP is configured).
What does execution of this script show?
$ ./load_bgp_config_part2.py
cisco_ios_ssh: pynet-rtr1#
BGP currently configured
cisco_xr_ssh: RP/0/0/CPU0:pynet-xrv#
BGP currently configured
arista_eos_ssh: arista-sw5#
BGP currently configured
Time elapsed: 0:00:11.051517
Given the above, BGP is currently configured on all three of the devices. But I want the BGP configuration to start out empty; consequently, I am going to add a function to remove the current BGP configuration.
My new code now looks as follows (the online version is here):
The most interesting part of the new code is the ‘remove_bgp_config’ function. This function uses the Netmiko send_config_set() method to send the configuration command ‘no router bgp [as_number]’ down the SSH channel. This function also checks if the device type is IOS XR, and, if so, executes a commit.
One additional thing to note, I have added an ‘as_number’ to the three device dictionaries in my_devices.py. These AS numbers are 42, 43, and 44 corresponding to the Cisco IOS, the Arista EOS, and the Cisco IOS-XR device, respectively.
The above code also prints out what happens during the configuration change:
$ ./load_bgp_config_part3.py
cisco_ios_ssh: pynet-rtr1#
BGP currently configured
config term
Enter configuration commands, one per line. End with CNTL/Z.
pynet-rtr1(config)#no router bgp 42
pynet-rtr1(config)#end
pynet-rtr1#
cisco_xr_ssh: RP/0/0/CPU0:pynet-xrv#
BGP currently configured
config term
Sat Oct 16 03:55:34.219 UTC
RP/0/0/CPU0:pynet-xrv(config)#no router bgp 44
RP/0/0/CPU0:pynet-xrv(config)#commit
Sat Oct 16 03:55:36.389 UTC
RP/0/0/CPU0:pynet-xrv(config)#
arista_eos_ssh: arista-sw5#
BGP currently configured
config term
arista-sw5(config)#no router bgp 43
arista-sw5(config)#end
arista-sw5#
Time elapsed: 0:00:21.808482
Reviewing the above...that all looks reasonable. It took about 22 seconds for this code to execute.
At this point, we are establishing an SSH connection to the device, checking if BGP is configured, and removing it, if necessary.
Configure BGP
Now let’s proceed to actually configuring BGP. In order to do this, I am going to use the Netmiko send_config_from_file method(). This method reads a file and sends each of the commands from the file down the SSH channel (as configuration commands).
Because of how this method operates, I need to create three configuration files: ‘bgp_arista_eos.txt,’ ‘bgp_cisco_ios.txt,’ and ‘bgp_cisco_xr.txt.’ These three files contain the configuration commands that I want to execute on the three devices.
$ cat bgp_arista_eos.txt
router bgp 43
router-id 10.220.88.32
neighbor 10.220.88.20 remote-as 42
neighbor 10.220.88.38 remote-as 44
$ cat bgp_cisco_ios.txt
router bgp 42
bgp router-id 10.220.88.20
bgp log-neighbor-changes
neighbor 10.220.88.32 remote-as 43
neighbor 10.220.88.38 remote-as 44
$ cat bgp_cisco_xr.txt
router bgp 44
bgp router-id 10.220.88.38
address-family ipv4 unicast
!
neighbor 10.220.88.20
remote-as 42
description pynet-rtr1
address-family ipv4 unicast
route-policy ALLOW in
route-policy ALLOW out
!
!
neighbor 10.220.88.32
remote-as 43
address-family ipv4 unicast
route-policy ALLOW in
route-policy ALLOW out
!
!
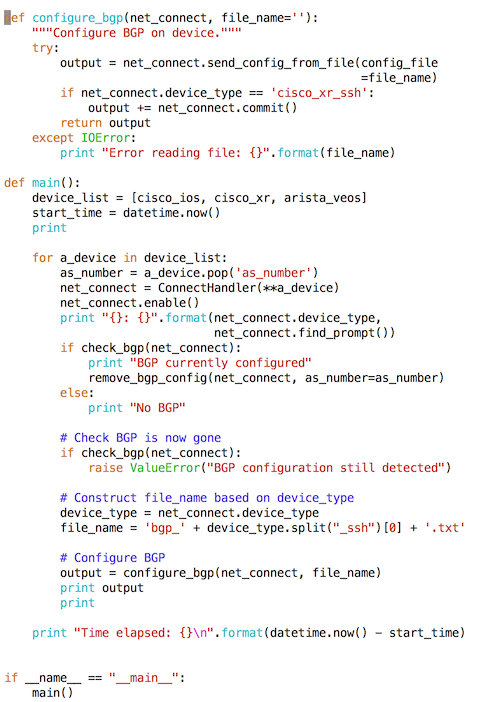
Relevant parts of the new code are shown below (the complete code is shown here).
This code basically passes each of the three file names to the configure_bgp function. Ultimately, the files are read and the configuration commands are sent down the SSH channel. Once again, a commit is executed if the device type is IOS XR.
When we execute this code, we see the following:
$ ./load_bgp_config_part4.py
cisco_ios_ssh: pynet-rtr1#
No BGP
config term
Enter configuration commands, one per line. End with CNTL/Z.
pynet-rtr1(config)#router bgp 42
pynet-rtr1(config-router)# bgp router-id 10.220.88.20
pynet-rtr1(config-router)# bgp log-neighbor-changes
pynet-rtr1(config-router)# neighbor 10.220.88.32 remote-as 43
pynet-rtr1(config-router)# neighbor 10.220.88.38 remote-as 44
pynet-rtr1(config-router)#end
pynet-rtr1#
cisco_xr_ssh: RP/0/0/CPU0:pynet-xrv#
No BGP
config term
Sat Oct 16 04:03:46.886 UTC
RP/0/0/CPU0:pynet-xrv(config)#router bgp 44
RP/0/0/CPU0:pynet-xrv(config-bgp)# bgp router-id 10.220.88.38
RP/0/0/CPU0:pynet-xrv(config-bgp)# address-family ipv4 unicast
RP/0/0/CPU0:pynet-xrv(config-bgp-af)# !
RP/0/0/CPU0:pynet-xrv(config-bgp-af)# neighbor 10.220.88.20
RP/0/0/CPU0:pynet-xrv(config-bgp-nbr)# remote-as 42
RP/0/0/CPU0:pynet-xrv(config-bgp-nbr)# description pynet-rtr1
RP/0/0/CPU0:pynet-xrv(config-bgp-nbr)# address-family ipv4 unicast
RP/0/0/CPU0:pynet-xrv(config-bgp-nbr-af)# route-policy ALLOW in
RP/0/0/CPU0:pynet-xrv(config-bgp-nbr-af)# route-policy ALLOW out
RP/0/0/CPU0:pynet-xrv(config-bgp-nbr-af)# !
RP/0/0/CPU0:pynet-xrv(config-bgp-nbr-af)# !
RP/0/0/CPU0:pynet-xrv(config-bgp-nbr-af)# neighbor 10.220.88.32
RP/0/0/CPU0:pynet-xrv(config-bgp-nbr)# remote-as 43
RP/0/0/CPU0:pynet-xrv(config-bgp-nbr)# address-family ipv4 unicast
RP/0/0/CPU0:pynet-xrv(config-bgp-nbr-af)# route-policy ALLOW in
RP/0/0/CPU0:pynet-xrv(config-bgp-nbr-af)# route-policy ALLOW out
RP/0/0/CPU0:pynet-xrv(config-bgp-nbr-af)# !
RP/0/0/CPU0:pynet-xrv(config-bgp-nbr-af)# !
RP/0/0/CPU0:pynet-xrv(config-bgp-nbr-af)#commit
Sat Oct 16 04:03:49.896 UTC
RP/0/0/CPU0:pynet-xrv(config-bgp-nbr-af)#
arista_eos_ssh: arista-sw5#
No BGP
config term
arista-sw5(config)#router bgp 43
router-id 10.220.88.32
neighbor 10.220.88.20 remote-as 42
neighbor 10.220.88.38 remote-as 44
arista-sw5(config-router-bgp)# router-id 10.220.88.32
arista-sw5(config-router-bgp)# neighbor 10.220.88.20 remote-as 42
arista-sw5(config-router-bgp)# neighbor 10.220.88.38 remote-as 44
arista-sw5(config-router-bgp)#end
arista-sw5#
Time elapsed: 0:00:25.424702
Now this is all fine, but we don’t actually know if our BGP configuration is working properly. Let’s add a final check into our script to verify that we have reached the Established state.
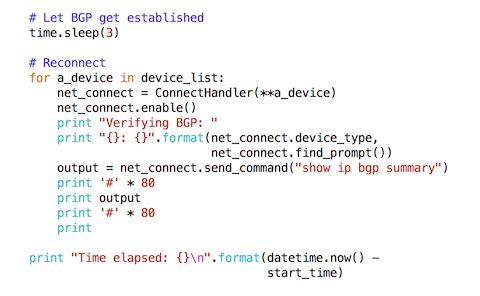
Our final script adds the following (the complete version of the script is here):
In the above, I sleep for three seconds. I then create a completely new SSH connection to each device and send the ‘show ip bgp summary’ command. Finally, I print the output from this command.
Executing this script yields the following (note this displays only the output verification section of the program):
Verifying BGP:
cisco_ios_ssh: pynet-rtr1#
################################################################################
BGP router identifier 10.220.88.20, local AS number 42
BGP table version is 1, main routing table version 1
Neighbor V AS MsgRcvd MsgSent TblVer InQ OutQ Up/Down State/PfxRcd
10.220.88.32 4 43 3 2 1 0 0 00:00:05 0
10.220.88.38 4 44 2 2 1 0 0 00:00:13 0 (SE)
################################################################################
Verifying BGP:
cisco_xr_ssh: RP/0/0/CPU0:pynet-xrv#
################################################################################
Sat Oct 16 04:09:17.163 UTC
BGP router identifier 10.220.88.38, local AS number 44
BGP generic scan interval 60 secs
Non-stop routing is enabled
BGP table state: Active
Table ID: 0xe0000000 RD version: 2
BGP main routing table version 2
BGP NSR Initial initsync version 4294967295 (Not Reached)
BGP NSR/ISSU Sync-Group versions 0/0
BGP scan interval 60 secs
BGP is operating in STANDALONE mode.
Process RcvTblVer bRIB/RIB LabelVer ImportVer SendTblVer StandbyVer
Speaker 2 1 2 0 1 0
Neighbor Spk AS MsgRcvd MsgSent TblVer InQ OutQ Up/Down St/PfxRcd
10.220.88.20 0 42 2 2 0 0 0 00:00:17 0
10.220.88.32 0 43 9 4 0 0 0 00:00:07 0
################################################################################
Verifying BGP:
arista_eos_ssh: arista-sw5#
################################################################################
BGP summary information for VRF default
Router identifier 10.220.88.32, local AS number 43
Neighbor Status Codes: m - Under maintenance
Neighbor V AS MsgRcvd MsgSent InQ OutQ Up/Down State PfxRcd PfxAcc
10.220.88.20 4 42 2 3 0 0 00:00:14 Estab 0 0
10.220.88.38 4 44 2 4 0 0 00:00:12 Estab 0 0
################################################################################
Time elapsed: 0:00:45.859180
You can see from the above that we have reached the BGP Established state on all three devices. Yes, there are no prefixes being advertised, but we are in the Established state nonetheless.
The final script took about 46 seconds to execute and consisted of 93 lines of code (including the device definitions in my_devices.py).
I recognize that the Python code shown in this article might be foreign to you, but hopefully you can get a sense that programmatically interfacing to devices is practical and that much can be accomplished.
If you are interested in learning more about Python and getting started on applying it to network automation, check out my half-day workshop at Interop.


